
One of my favorite things to do in Illustrator is to make color palettes, usually from photos I take or photos I access through a site like Unsplash. Using “Create Object Mosaic” makes this an easy and oddly satisfying task. Color is actually a complicated subject and there is a very scietific way to choose colors that work well together. But for someone who is just learning, I don’t think there is anything wrong with playing around with color palettes and just picking colors you love without thinking too much about color theory.
I’ve taken many classes on Illustrator from a variety of sources but this little Mosaic tip was only ever mentioned by one instructor, Helen Bradley. I don’t know why this tool isn’t mentioned more often as a way to create a color palette in a snap but I thought I’d share it with you here.
This isn’t an Illustrator tutorial, or a color theory class, just a quick intro to the Mosaic tool, so you should already have a pretty good grasp of Illustrator basics.
Even though I can really geek out using my eyedropper tool to pull colors from a photo, there are times when I want to speed up the process. Also, there are times when I can’t quite get the eye dropper to grab the exact shade I want, so I’ll often create a mosaic so I can better isolate a tiny bit of the perfect color.
You can try this by first placing the photo you want to use to build your palette in your document.
Since I usually delete my photo once I’ve collected my colors, I don’t embed the photo. If you go to activate the mosaic tool and see it is greyed out, meaning it is not accessible, you may need to embed your photo first.
I’m going to use this photo of the most adorable cocktail I’ve ever seen. This bright and fun concoction was served up at Farmhouse Kitchen Thai Cuisine located in the Pearl District of Portland OR. And BTW, their food is delicious too!

Next, with the photo selected, go up to the top menu and select object then scroll down to create object mosaic.
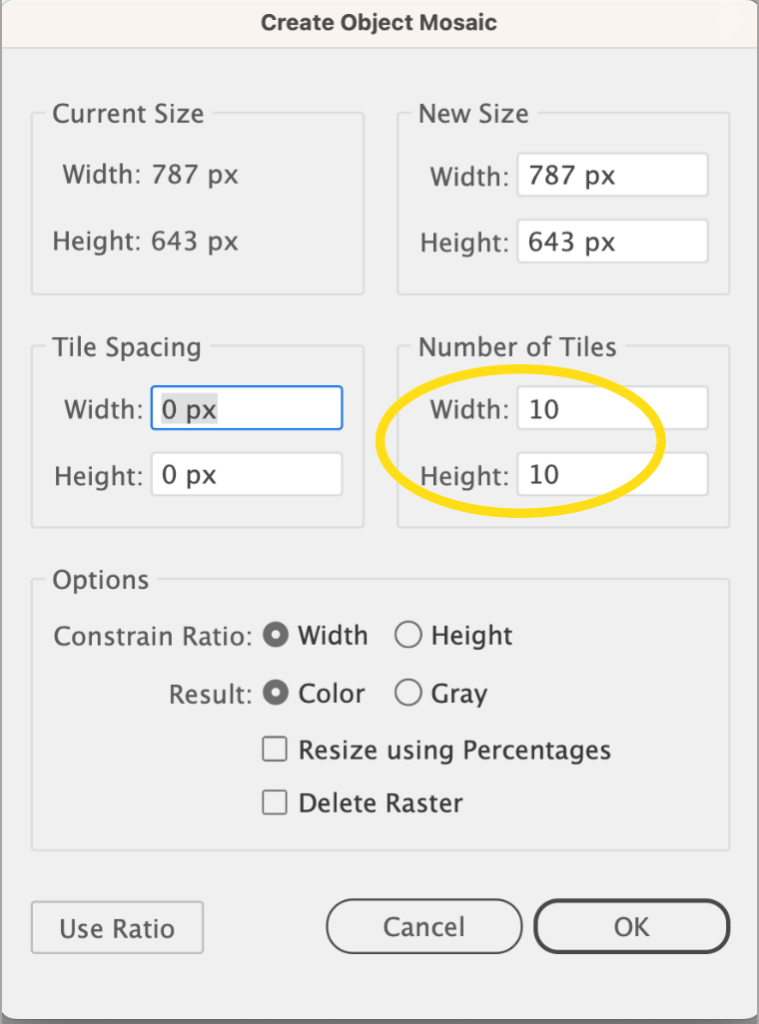
Don’t concern yourself with any of the settings except for the number of tiles. You can leave it on the default of 10 or, depending on how many of the fine detail colors you want to grab, increase the number of tiles.
Here is my photo using the default of 10 columns and 10 rows.

Here’s the same photo set to 30 and 30.

Your photo will still be intact and is a separate object under the mosaic so you can select it and move it off your photo. But even better than that, you can pull out all these colors separately.
To do that, select the photo mosaic and ungroup it. Now you can pull out each individual square!

You can see here with the mosaic ungrouped, I pulled out a few of the tiles I want to use for my palette.
Continue to pull out a few (or a lot) of key colors you want to use in your design.
Once you have all your colors arranged outside the mosaic, select all of them to make a color group to add to your swatches panel. Don’t forget to save them to your library for later use in a new file. You can further fine tune your palette by using more precise techniques. This can take a while, but I find in the beginnng stages of my process, just grabbing colors is the esiest way to get started.
How quick, easy and fun is that? Again, a big shout out to Helen Bradley for this nifty trick. You can find Helen on Skillshare and YouTube where she teaches TONS of classes on designing in Illustrator and Photoshop. Her classes get right to the nitty-gritty of the topic and she explains every step clearly.
Anyway, that’s it for now. Hope you learned something new and helpful. Let me know if you have ever used the mosaic tool for anything other than to create a color palette.
Thanks for reading!

